Our Homemade Ice Cream of this week was Peach Pie 🥧. It was good, but it has been unanimously agreed upon that our Mint Chocolate Chip is still hands down our best flavor yet! My husband has been begging me to make that one again, but trying new flavors is so fun for me.
This one does not require any heating time, so the process moves along much quicker. I suggest keeping your Sugar Cone crumbles on the bigger side to get that perfect crunch. The texture was definitely my favorite part about this flavor, even thought my pieces weren’t big enough.
These peaches were brought to us by Grammy Kat in a giant box that she picked up on sale for us to share between us, but I’d love to re-make this flavor using the peaches from our own garden one day. I will definitely add some crushed Graham Crackers in with the sugar cone crumbles too when I re-make this with our homegrown peaches. Ours are still growing & no where near ready to pick yet. However, I am still in complete awe over how much our baby peach tree grew in just one year!! Its huge now!
Ingredients
1 pint Heavy Whipping Cream
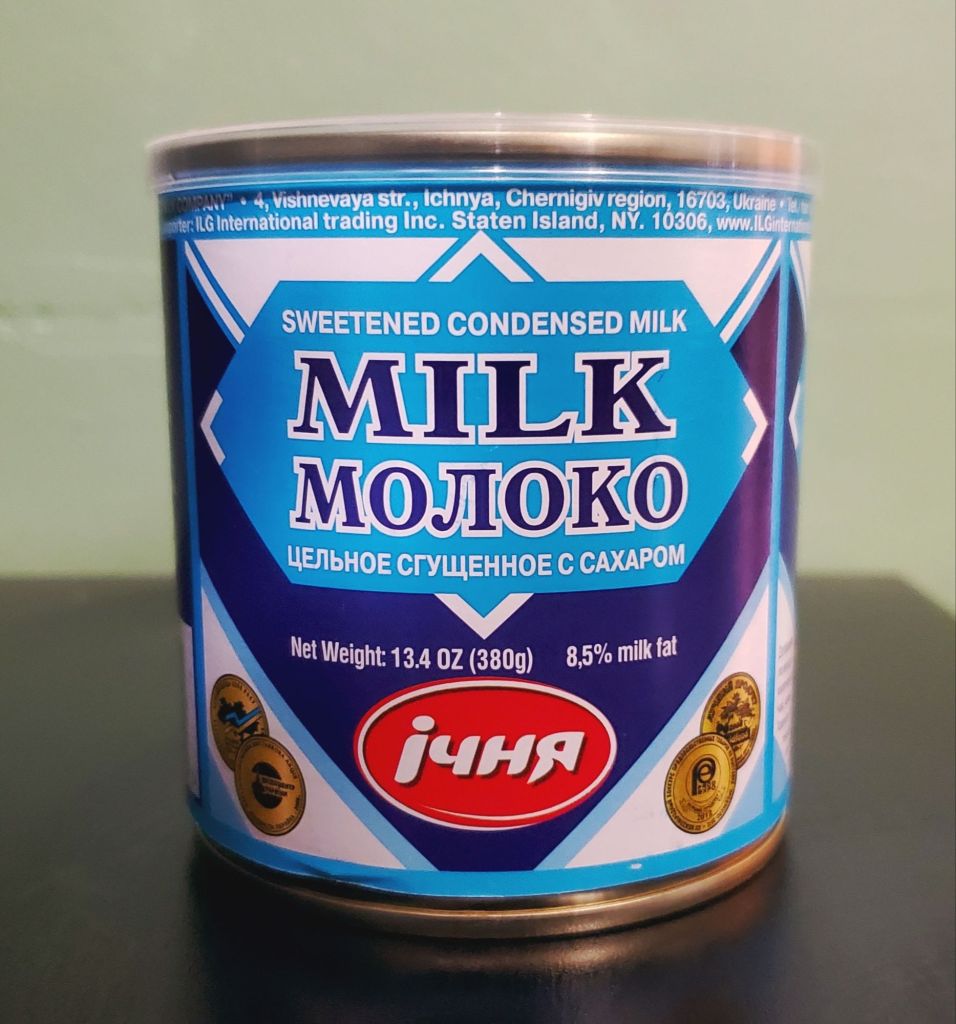
1 can Ukrainian Condensed Milk
6 ripe peaches, diced
1 tbsp vanilla extract
1 sleeve Sugar Cones, crushed
Sugar Cones (for serving)
Directions
PREP – Wash & cut peaches. Blend peaches to preferred consistency. Set aside. Crush box of sugar cones to your liking, set aside.
WHIP – Whip your heavy whipping cream using your Kitchenaid Mixer or hand mixers until you get the consistency of Whipped cream topping. Add in Ukrainian Condensed Milk, whip again. Add in Vanilla Extract, whip again. Add blended peaches, whip again.
I’m officially obsessed with making my own Ice Cream! It’s so fun & easy. There are SO many flavor combinations to try!
If you don’t know this about me – one of my dreams is to start an ice cream 🍦 shop called Morozovo’s because the Ukrainian word for Ice cream is морозиво, which is pronounced in English like our last name just with an extra “o” on the end! I really (like.. really, really) love ice cream & feel like it’s a calling for our family!
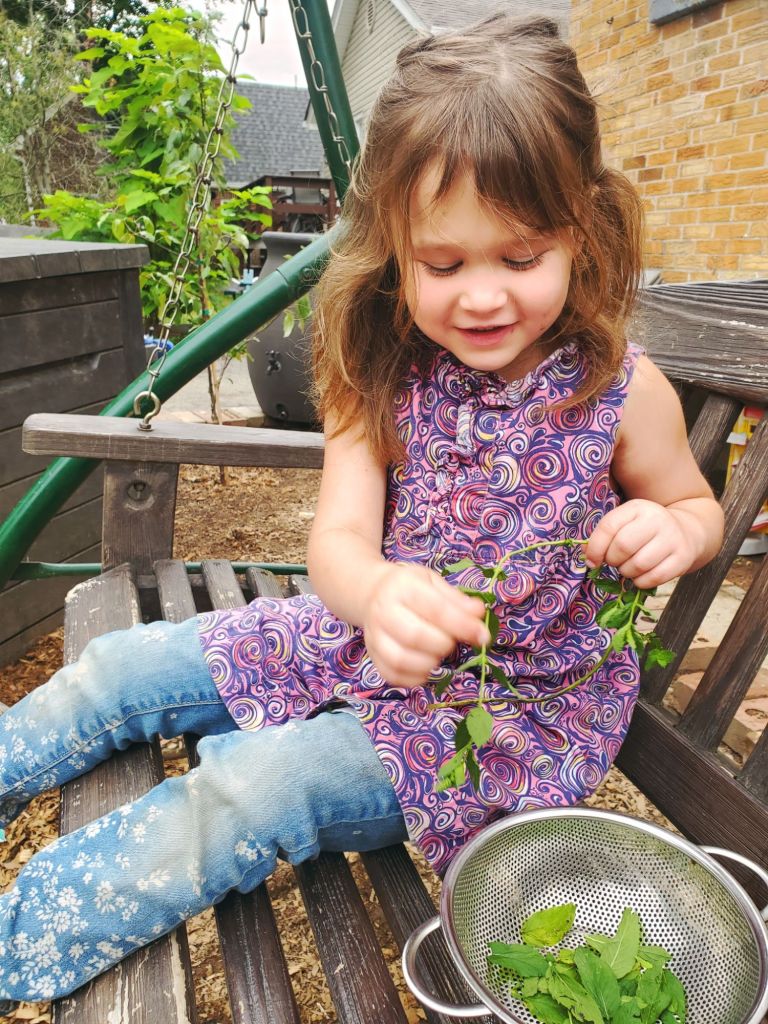
Our first step was to go out into the garden and collect some fresh mint. Athena was my big helper in this step & had a lot of fun with it. She said she felt like she was in a wedding carrying the “bouquet” of mint.
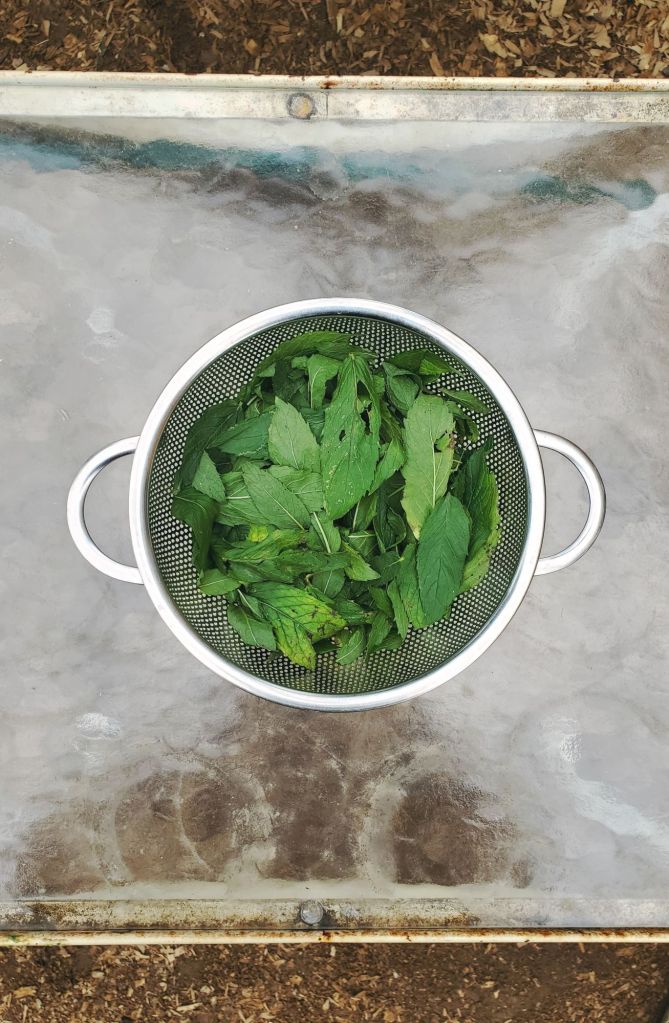
After we collected enough mint, we sat down together on the swing and picked off all of the leaves and placed them in this mini colander to be cleaned once we were back in the kitchen.
We collected and picked a good amount, then took our colander inside to clean & roughly cut the mint. I find using kitchen scissors easiest for this.
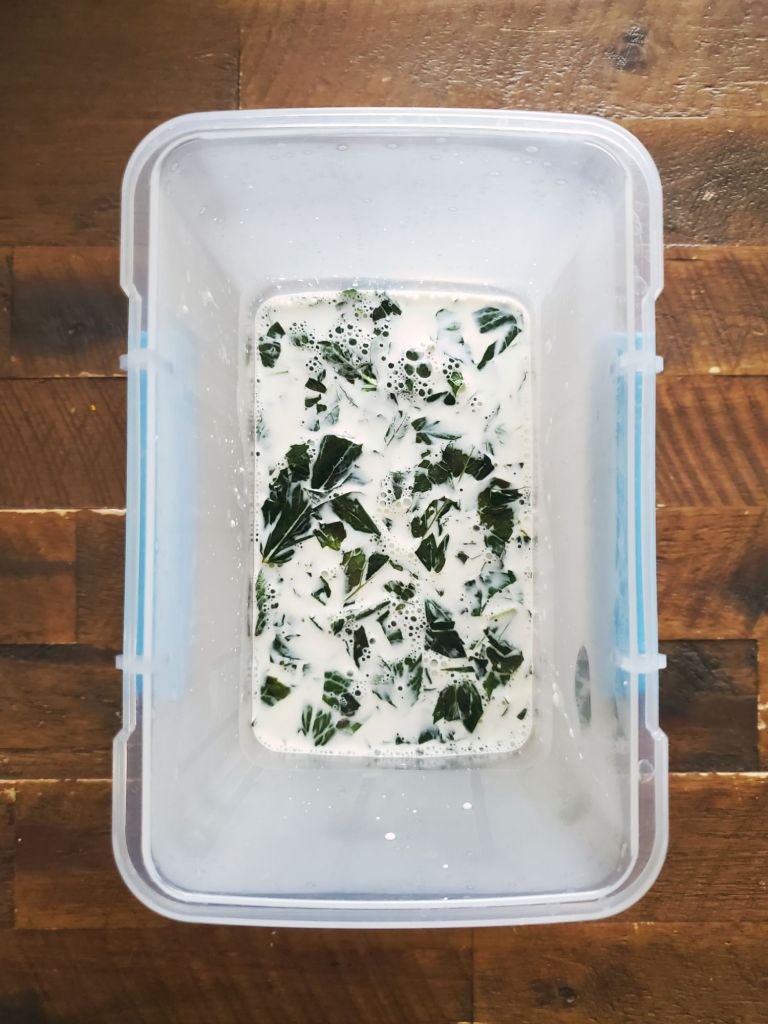
We then poured our pint of heavy whipping cream into the Dutch oven pot on the stove, threw in the chopped mint, and heated just until hot to let that flavor really begin to release into the cream. Do not overheat, or it will not whip as well for you. Remove from heat, let cool to room temperature, pour into container with lid, and let cold steep in the refrigerator for at the very least 12 hours.
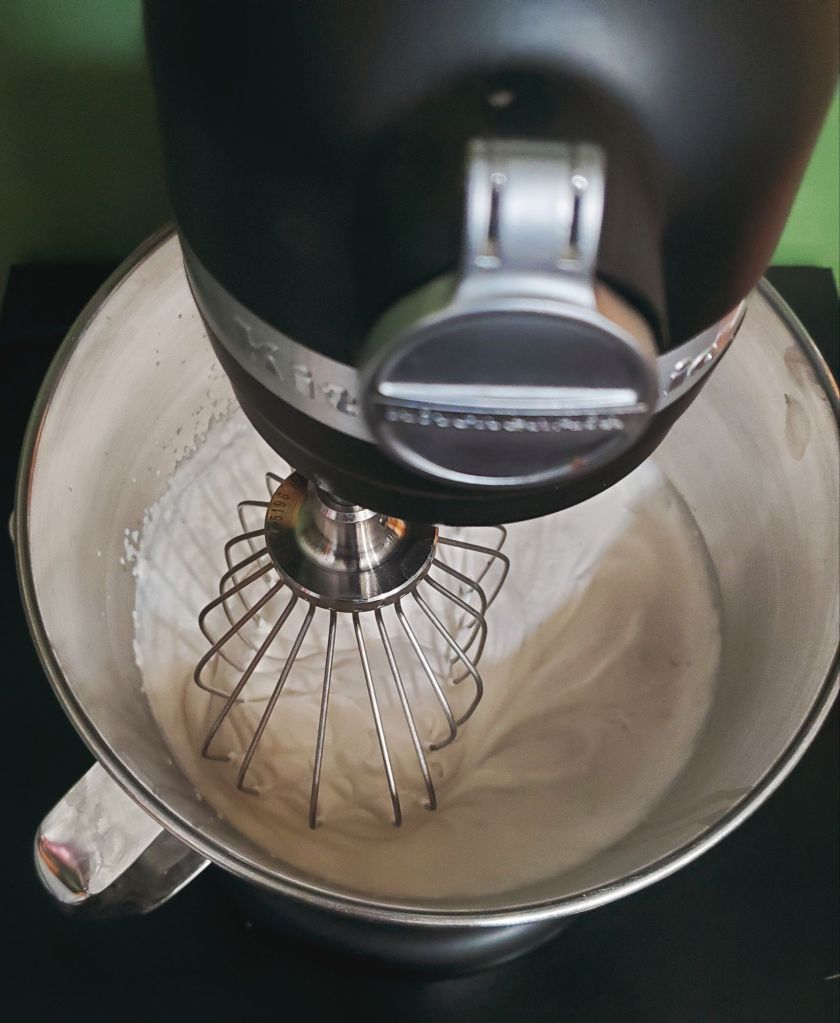
After cold steeping in the refrigerator for at least 12 hours (the longer it steeps, the stronger the mint flavor will be), strain mint leaves by using cheese cloth over your Kitchen Aid Mixing Bowl.
Whip the cream with the whisk attachment until you have a Whipped cream consistency. Hand mixers would probably work even better, if you have those.
Once Whipped, add in 1 can of Ukrainian Sweetened Condensed Milk & whip again. I imagine American Condensed Milk will work if you don’t have access to a European market, but the Ukrainian one just tastes SO much better {see note}!!! Finally, add 1 tablespoon of vanilla extract & whip again one final time.
{NOTE: after comparing Ukrainian to American Condensed Milk with my тато, we found that Ukrainian Condensed Milk has at least double the amount of sugar as American, which is why it noticeably tastes better than American Condensed Milk. With this difference, you will have different results if using American Condensed Milk. You may have to add in sugar, but since I have not done it this way, I am unsure of when or how much sugar to add.}
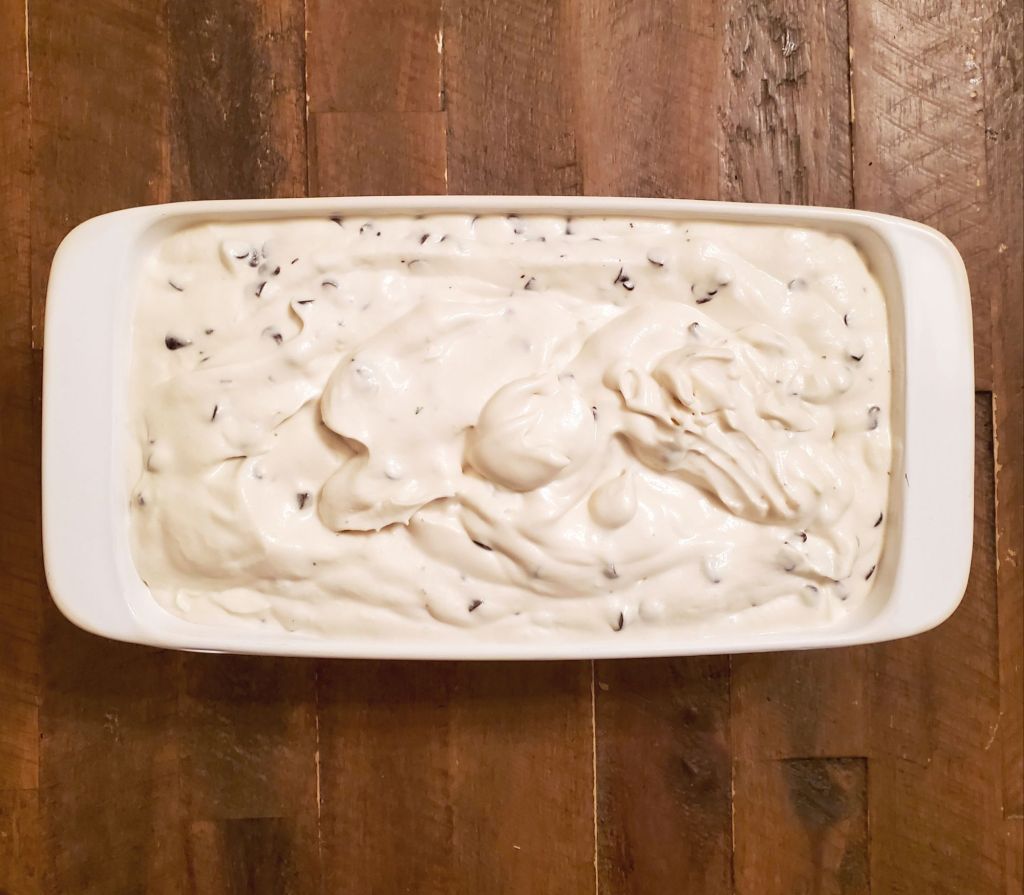
Gently fold in mini chocolate chips until all mixed together really evenly. I used semi-sweet because that was all that was available in mini, but feel free to use whatever you like here. Milk, dark, mini, chunk – it’s your ice cream, make it exactly your way!
Once all blended together, pour into a Loaf pan & place into freezer. The first day is good, but the second day is even better so if you have enough self-control, let it freeze overnight for best results. However if you need to try it right away, same. Just make sure to save enough to try the next day too!
Once it freezes & you are ready to eat, let it sit on the counter for a few minutes to let it soften up a tiny bit to make scooping easier. Scoop into bowl or cone & enjoy!
The flavor of the fresh mint in the ice cream is SO good! Plus I was super happy to use up some more of my mint in my garden! All of the kids agreed that the homemade Mint Chocolate Chip ice cream was way better than store bought – even Sasha who has never liked a store-bought mint chocolate chip before. She was the first to ask for seconds!
I hope you like it as much as us!
Ingredients
1 pint Heavy Whipping Cream
Fresh mint (I used probably 75-100 leaves)
1 can Ukrainian Sweetened Condensed Milk
1 tablespoon Vanilla Extract
1 bag mini semi-sweet chocolate chips
Directions
1 – MINT: Gather, wash, & cut mint.
2 – HEAT: Pour Heavy Whipping Cream into pot on stove, using medium low heat. Add mint leaves. Stir constantly until just hot, then pour into container & let cool to room temperature. Once cool, refrigerate 12+ hours.
3 – STRAIN mint leaves from cream using cheese cloth over your mixing bowl. Discard leaves.
4 – WHIP the cream into a Whipped cream consistency. Add in 1 can Ukrainian Condensed Milk, whip again. Add in 1 tablespoon Vanilla Extract, whip again. {🍦Begin at this step if NOT using mint🍦}.
5 – FOLD in chocolate chips gently & evenly throughout the cream mixture.
6 – POUR mixture into Loaf pan & freeze overnight.
It has been SO incredibly hot here this week, and next week isn’t looking any cooler either!
My in-laws brought over a giant tub of leftover watermelon from their Father’s Day weekend that I wasn’t loving the texture of, but I certainly didn’t want to waste it, so I turned it into delicious and hydrating smoothies!!!
Strawberry Watermelon 🍓🍉 Smoothie
Watermelon (I used 3 slices each blend)
Strawberries (I used 6 each blend)
1 cup Almond milk
Handful of ice
Honey
Mint leaves from my garden
Smoothies are super easy to make. Just throw all of the ingredients in a blender and serve. You can add more or less fruit depending on what you have available to you or prefer taste-wise. Each blend made 1 adult + 2 child size cups, or 2 adult size cups. I didn’t want to over-stuff the blender, so I worked in batches for our large size family.
The kids weren’t huge fans of the mint, but love it without it. Sasha had such a cute idea and placed an extra strawberry on the rim of their smoothies to look fancy & also have a little snack to go with it.
I personally couldn’t get enough of them with the mint! It was seriously the perfect beverage to cool down & enjoy on the porch after a sweaty afternoon in the garden! It was a really nice, healthy treat that wasn’t loaded with added sugars. Plus I was really happy to find a way to use my mint!!
This is definitely going to be my new go to Smoothie this summer! I’m also excited to make other varieties of it as well using the same base: maybe add some cucumbers, other berries, coconut milk, lemon, or greek yogurt. There are endless ideas & they all sound like they’d be good!
I made a big batch of Ukrainian Halva Cookies yesterday morning! I divided the batch up three ways: some for my friend & Ukrainian teacher Anna as a housewarming gift for her new home, some for my dad because I love bringing him Ukrainian recipes I make, and of course some for my home too!! They were really, really yummy & I will definitely be making again very soon.
Ingredients
2 sticks salted butter
1 1/2 cup white sugar
1 egg
2 teaspoons vanilla extract
2 1/4 cup all purpose flour
1/2 teaspoon baking powder
1/2 teaspoon sea salt
2 tablespoons sesame seeds
2 tablespoons poppyseeds
Prepared Ukrainian Sunflower Seed Halva
Directions
Preheat oven to 350°
Cream together butter & sugar using the paddle attachment on your mixer.
Add egg & vanilla extract, mix again.
In another large mixing bowl, whisk together the flour, baking powder, and salt. Then add to butter mix & mix until all combined to form a dough ball.
Divide dough in half, wrap in plastic wrap, roll out to flatten, then place in refrigerator for 30 minutes.
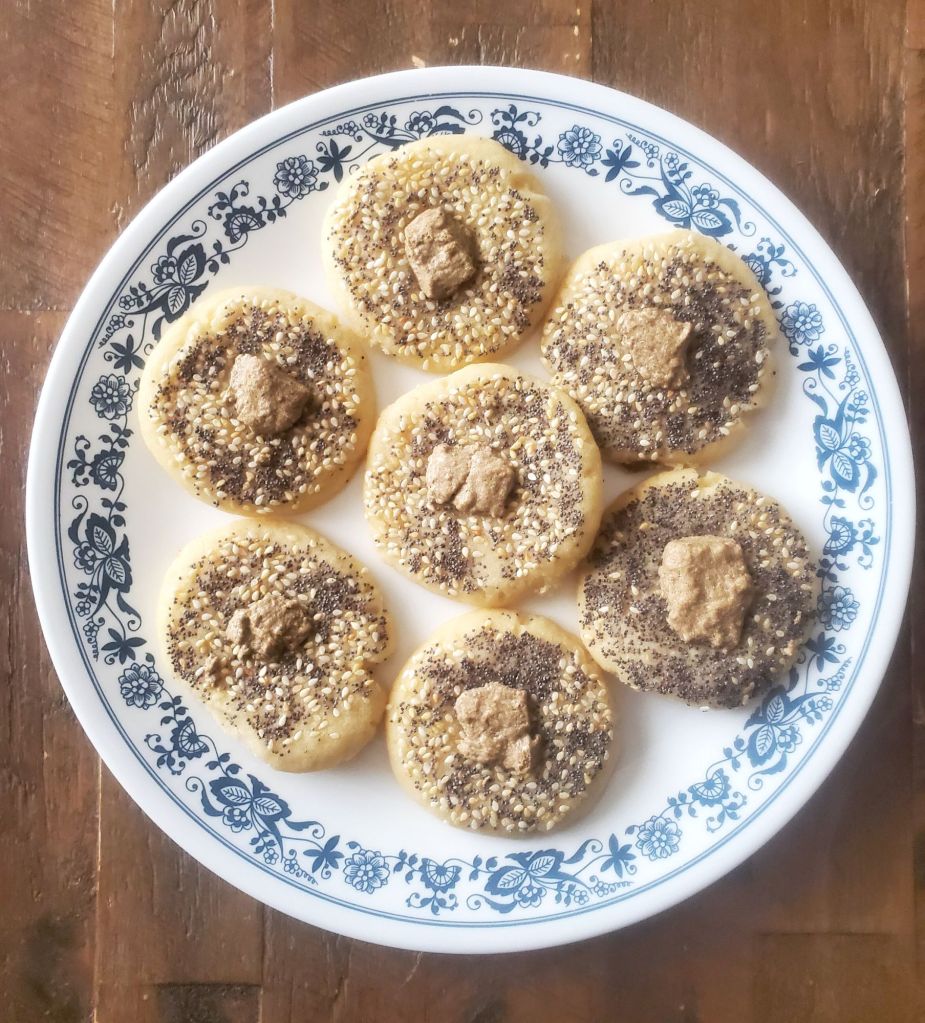
While dough is chilling, mix together sesame seeds & poppyseeds on a plate. Cut prepared halva into bite size pieces.
When dough is finished chilling, cut into equal sizes and roll into little dough balls. Squish down into seed mixture to flatten into cookies and place on baking tray.
Lightly push a piece of halva into the center of each cookie.
Bake for 10-12 minutes, let cool for a bit & enjoy!!
My mini homestead has really taken off this year! I am really proud of how far it’s come and what all I added this year. We don’t have a huge lot of land we are working with, but we have a decent size yard & we are planning to use every inch we can to live off of. Eventually, we’d love to own our own big farm with our own water source, but for now we are fulfilling our mini homestead dreams + getting knowledge & practice for the real deal!
As a vegetarian, I really want my kids to know where their food comes from + how to grow their own food from seed. I want them to know how to be self-relient & self-sufficient. Part of that is learning how to stretch food as far as you can take it & waste as little as possible.
I am Ukrainian, so naturally it’s in my DNA to love beets. I thought that would be a great vegetable to start with! Today I am going to teach you how to use the entirety of the Beet to make not just one meal, but an entire days’ worth of meals from just a few beets so that absolutely no part will be wasted & you stretch your produce as far as it can go.
We will then compost the scraps & propagate our Beets to re-grow in our garden, so that even the used up & unusable parts still get re-used too and leaves you with 100% zero waste.
The first step is going to be peeling, slicing, and then washing your 6-8 Beets. Make sure to SAVE your beet tops (the part that looks like lettuce.) You will want to cut this off, wash, rinse well, and set aside to use.
To cook your Beets:
Place sliced Beets, 1/2 cup white vinegar, 2 bay leaves, 6 teaspoons Minced garlic, 2 teaspoons sea salt into a pot, then cover with water.
Cook for 30 minutes, drain, rinse, & let cool. Now they are ready to use!
Breakfast: Raspberry Banana & Beet Smoothie
Smoothies are such a great way to start the day! This one was really yummy! In most beet drinks I’ve had, there is an overwhelming beet flavor. This one has a much more subtle beet taste too it, but you can definitely still taste it. The color was so beautiful!! Just throw all of the ingredients together in the blender & enjoy!
1 cup ice
Raspberries
Beets
1 banana
1/2 cup vanilla Greek Yogurt
1 tablespoon chia seeds
2 tablespoons Oatmeal
1/2 teaspoon tumeric
1 1/2 cups Almond milk
Drizzle of honey
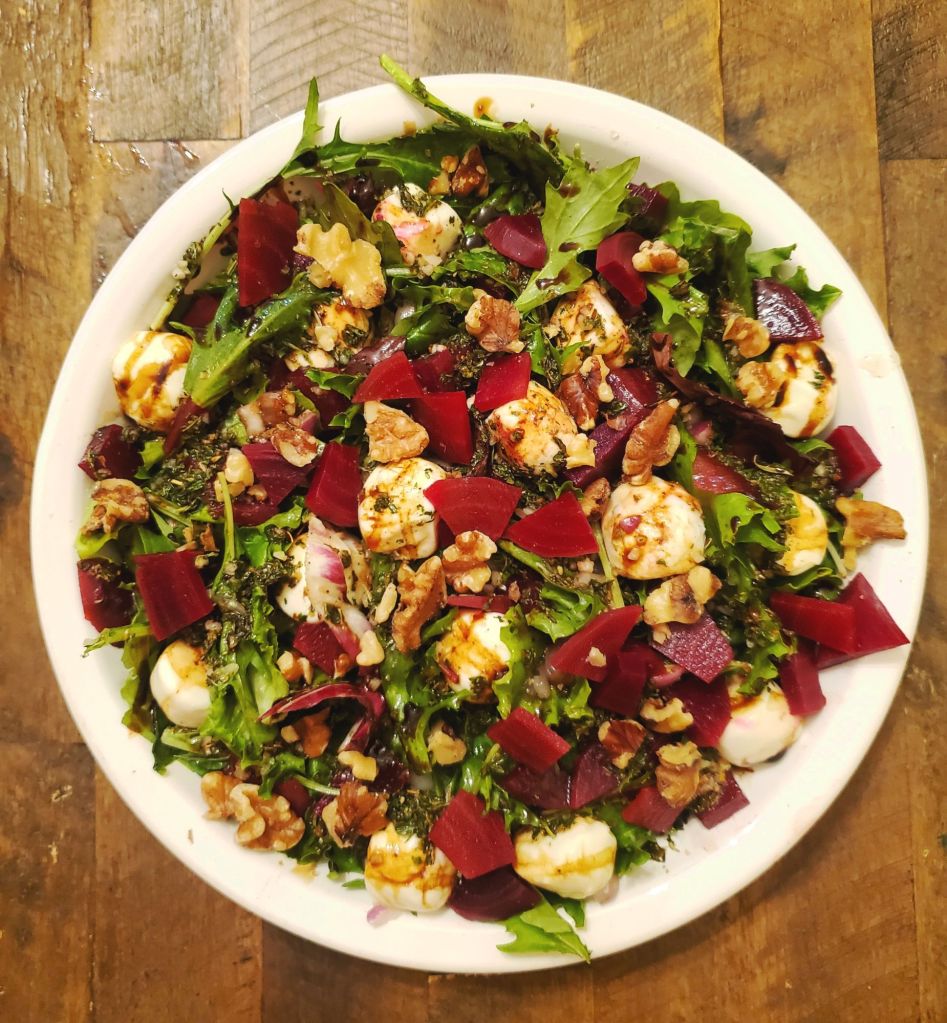
Lunch: Beet Salad with Balsamic Drizzle
I used a spring + arugula lettuce mix as the base of this salad. I dressed the salad with homemade dressing {listed below}. Then I topped it with Mozzarella Cheese balls, chopped up Beets, walnuts, salt & pepper, & my favorite: Nonna Pia’s Balsamic Glaze.
Dressing:
2 tablespoons sunflower oil
2 tablespoons Almond oil
Juice from 1 lemon
1 tablespoon parsley
1 tablespoon oregano
1 tablespoon Green Harvest Seasoning
1 teaspoon salt
1 teaspoon Minced garlic
Dinner: Beet Top & Feta Bake
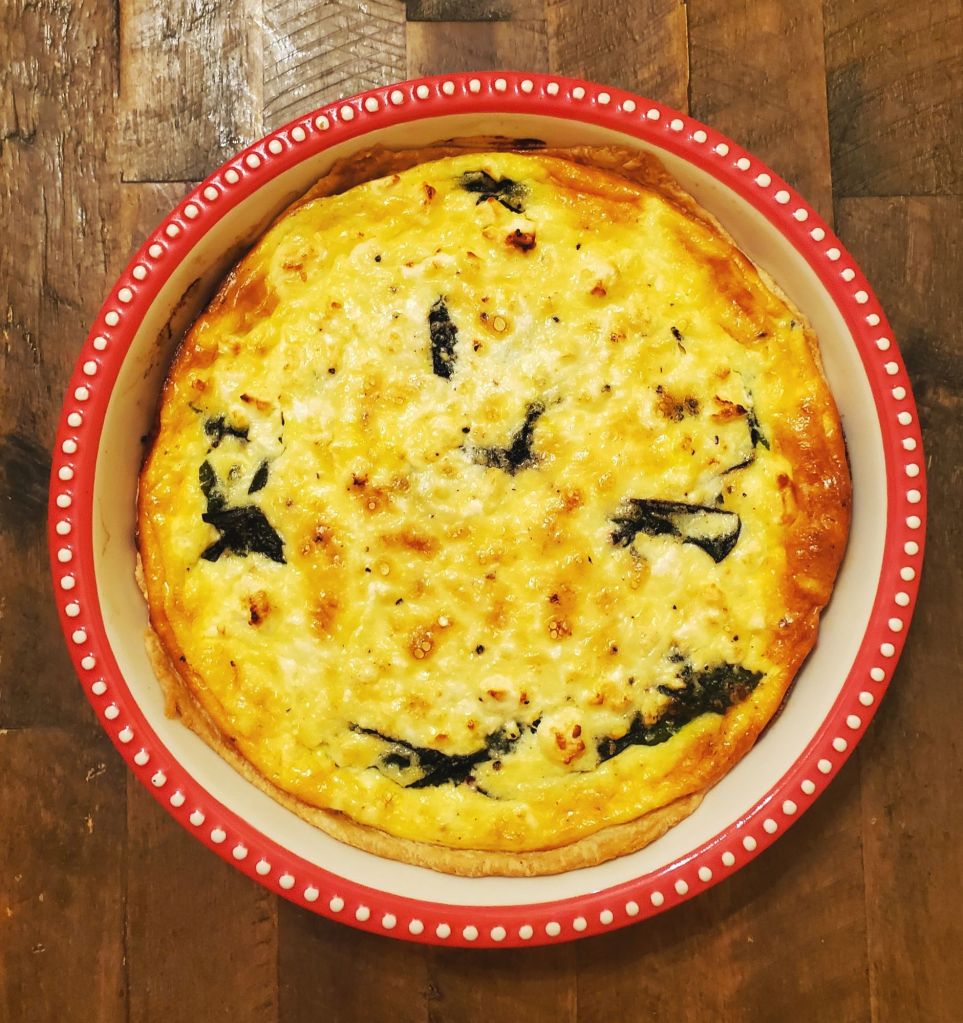
Ella has been asking for quiche lately, but this Tart is even better! It is just like quiche, but much creamier & uses a lot less eggs. It’s SO tasty, I could honestly eat the entire thing to myself in a day or so.
Place beet tops in a large pot & cover with water & salt. Cook until wilted, drain, set aside to cool. While beet tops are cooking, Preheat oven to 350° & roll out your pie crust over your pie pan, then set aside to cool.
Once beet tops are cool enough to touch, fill bottom of pie crust. Next, evenly spread Feta cheese to create a layer over the beet tops.
In a mixing bowl, mix together milk, eggs, & Creme fraiche until blended. Salt & pepper to taste, mix again. Pour mixture over Feta cheese layer. Cook for 50 minutes. Let cool for at least 10-15 minutes to set.
1 pie crust
Beet tops (from 6-8 beets)
Feta cheese (6 oz)
1 container Creme Fraiche
4 eggs
1/2 cup milk
Salt & Pepper to taste
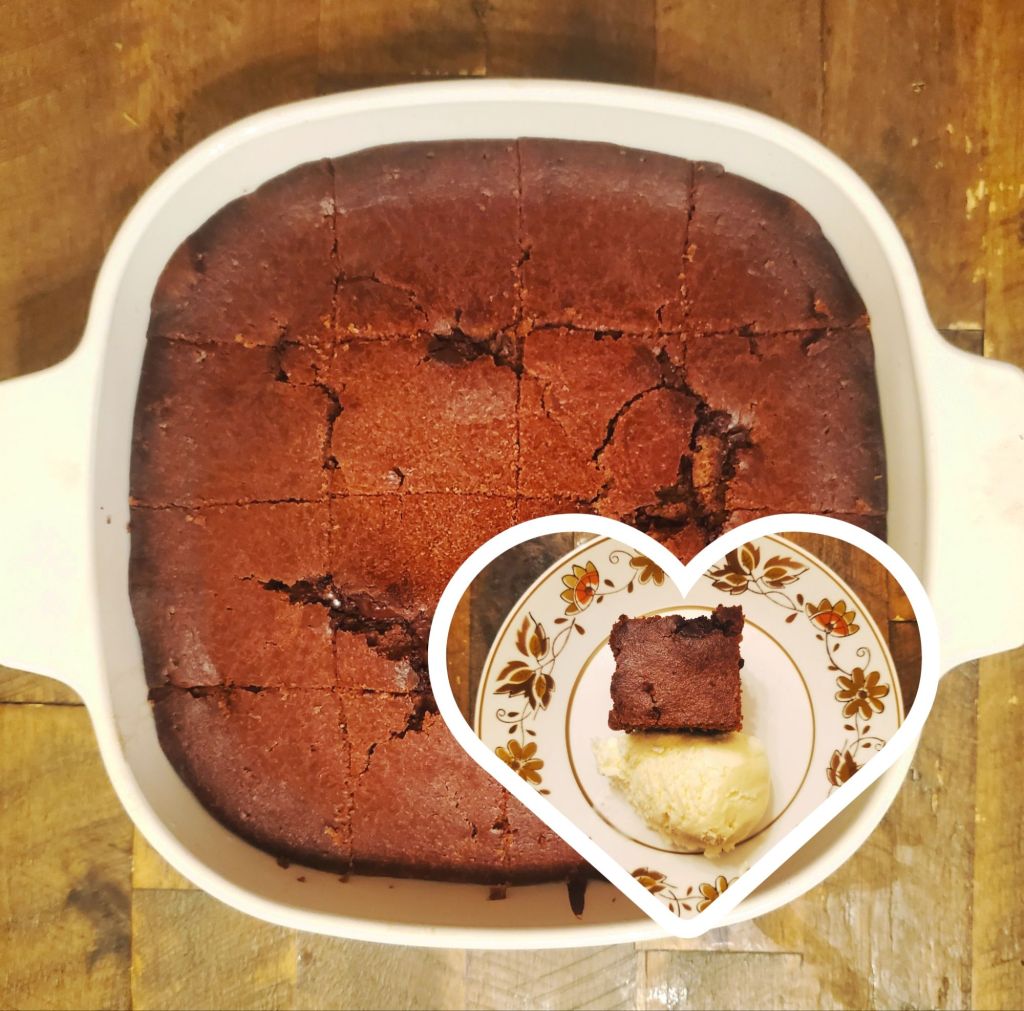
Dessert: Chocolate Beet Cake
This was good, but definitely would have been better with chocolate Frosting. I thought that the ice cream would have been enough, but it was still more dry than traditional chocolate cake. That didn’t stop it from being gobbled up though!
Large beet
2 tsp vanilla extract
4 eggs
1/2 cup milk
1 1/2 cups all purpose flour
1 cup cocoa powder
1 tablespoon baking powder
1 cup powdered sugar
3/4 cup sunflower oil
Half a bag of dark chocolate chunks
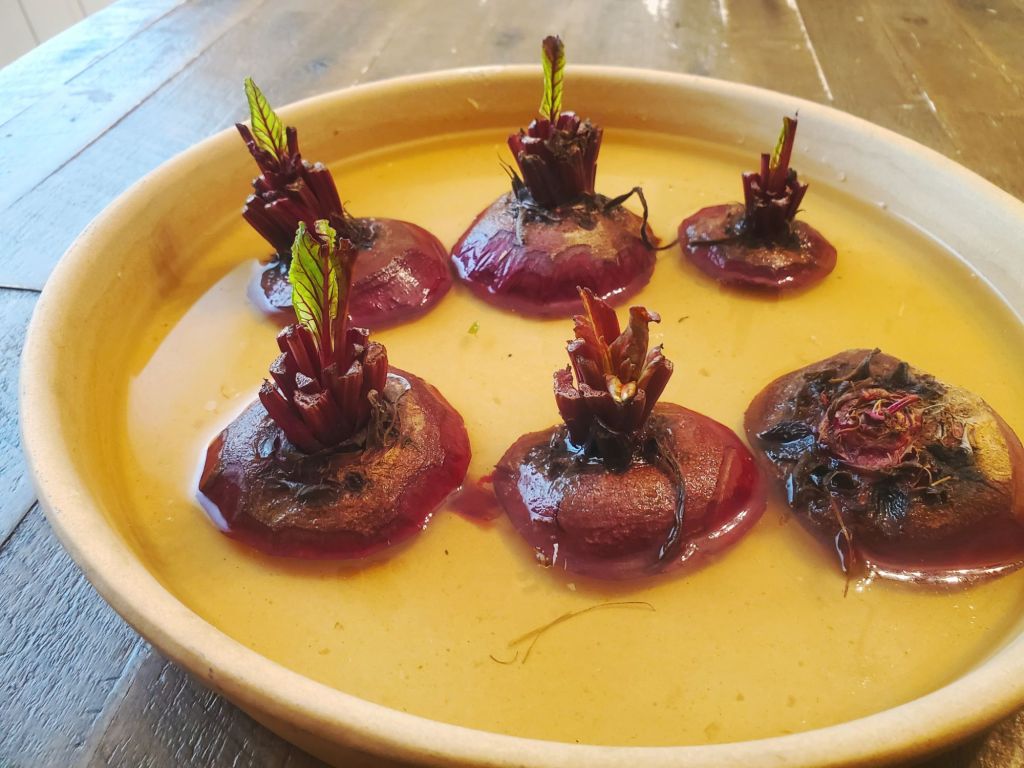
Beet Propagatation
• Day One •
Place the rest of the unused beets in a shallow bowl with water. I used this pie plate because it was big enough to fit all of mine.
Day Five
New leaves have began growing on our Beets over the last few days, which means they will be ready to plant in the soil soon! I’m planning to let these continue to grow their leaves in this dish for another week or so, then move them to their permanent locations in the garden.
I had a lot of fun with this no-waste challenge & hope that you were able to get some inspiration from it! I am definitely inspired to continue learning how to run a no-waste mini homestead & excited to figure out what vegetable I’ll use for the next challenge!
Lately, I’ve felt like the food quality everywhere has gone downhill really bad. We rarely eat a meal out, but when we do we are always met with disappointment and upset tummies.
Sometimes though, ordering a couple pizzas is really convenient, especially for a large crew.
But this pizza is seriously so easy, so much better tasting than take out, and WAY cheaper. It takes literally no time at all! Once you realize how quick & effortless it is to make your own pizza at home, you’ll never have to order take out ever again.
Ingredients
3 Cups All Purpose Flour
1 1/4 Cups Warm Water
1 Tablespoon Yeast
1 Tablespoon Sugar
1 Teaspoon Salt
1 Teaspoon Oil
STEP 1. Mix your yeast with your warm water. Stir immediately, then let sit for 5 minutes until frothy & bubbly.
STEP 2. In your stand mixer: add flour, salt, and sugar. Whisk until combined.
STEP 3. Add yeast & oil to stand mixer bowl, mix using the bread attachment. Let knead 5 minutes.
STEP 4. Gather dough ball onto floured surface & cut in half. Roll out onto pizza pan and add sauce, cheese, and toppings (do not pre-bake crust).
STEP 5. Bake at 500° for 10 minutes
That’s it. Seriously. It’s THAT easy!
Pizza is so versatile, you can use any ingredients you already have on hard or plan ahead with your favorite toppings. This dough makes 2 Pizzas. Make them both at once, or freeze one for a later time to make pizza night even easier!
I am sharing my Ukrainian Plentika Bread recipe here to keep it safe as the paper I have it on is getting very worn out and I don’t ever want to lose this recipe because it is important to me.
I want to begin by saying this isn’t my recipe. This is my friend, Oksana L’s recipe, who taught a wonderful Masterclass about Ukrainian Braided Wedding Plentika Bread. This recipe uses the Metric system (which now that I have learned it, I prefer it!). This recipe can also be used for: Kosar, Lezhen’, Diven’, and Kolach.
1. 300 g milk
2. 14 g fresh yeast (or 7 g Active Dry Yeast)
3. 40 g sugar
4. 100 g eggs (if your eggs are too big, separate the whites to adjust to 100. It is better to have more yolk than white if you do need to subtract.)
5. 670 g Bread Flour
6. 14 g salt
7. 100 g butter
Using a kitchen scale, add the ingredients step by step beginning with #1.
Warm milk to just warm to touch. Mix in sugar and add the yeast. Set aside for 5-10 minutes for the yeast to activate and froth up.
Add the eggs, flour, salt, and butter.
Start kneading. Knead for 10 minutes. Really beat the shit out of the dough. I mean form a club with it, slap it on the table as hard as you can, really beat it up. The rougher the better. Then form dough into a ball.
Place dough ball inside of plastic bag (grocery bag works fine – cut end of bag and cut open to make a flat sheet to keep dough under while forming) and keep on table for 1 hour. Roughly, punch down the dough, and proof for 1 more hour then make Braid. — Alternatively, place dough in refrigerator and leave overnight to save for later baking.
Divide bread into 3-4-5-6 parts and cover with cut plastic bag sheet. Roll out each strand and form the Braid. Proof the braid covered with plastic for 1-2 hours.
Pre-heat oven to 375 F.
Egg wash the braid twice, sprinkle seeds (I used poppy & sesame) on top. For egg wash, separate the yolks, putting the whites aside (you can use the whites for another recipe).
Bake for 30-35 minutes.
Ukrainian Superstitions & Kitchen Rules:
💙💛 It is bad luck to not sit while bread is baking – you MUST stay off your feet.
💙💛 Do not eat fresh bread out of the oven, let it cool down first. If you are having company over, it is best to bake the bread ahead of time so that the bread is cooled by the time your guest arrives, but leaves your home smelling of freshly baked bread for them.
💙💛 You are not allowed to think negative thoughts or speak negative words while baking/cooking. The food absorbs the energy you put out into the universe, bad energy will cause food to be “bad.” You only want to put love into your food. The food knows.
💙💛 Always add salt to dough, even if the recipe you are using does not call for it.
💙💛 At weddings, couples break the Plentika Bread and whoever takes the bigger piece becomes the “Ruler of the Family.”
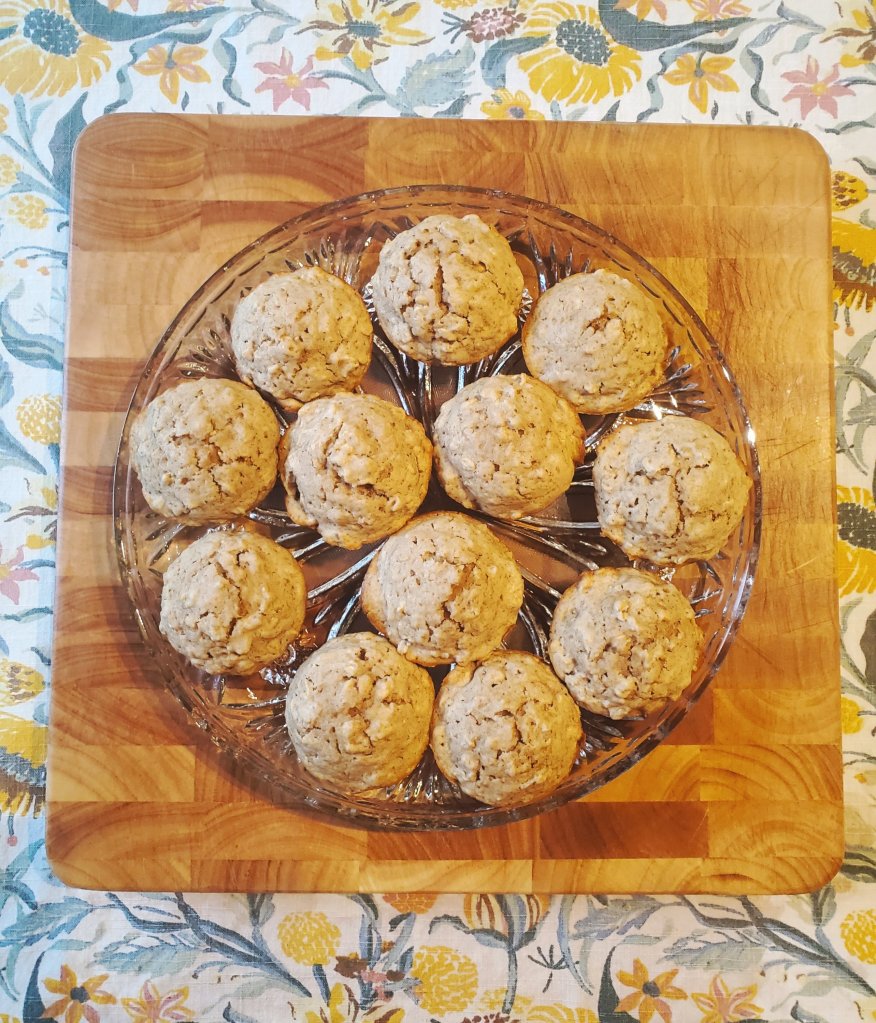
Don’t you love something home-baked in the morning to start your day? I know I do, but baking on weekday mornings can be a challenge. That is why I am SO excited to share these oatmeal muffins with you!
These only took minutes to throw together and 15 minutes to bake in the oven. They are PERFECT for an easy weekday baked treat because they are SO easy to make! I personally think that home-baked treats taste best fresh out of the oven, but you can totally make these ahead of time for an easy grab-and-go breakfast or mid-day snack.
This is seriously such a good base for an oatmeal muffin. You can eat them just like this (we did) or you can add any fruit or nuts you would like to make it even healthier. Chia seeds are always a great mix-in because you can’t taste them, but they are SO good for you! Of course, chocolate chips are always a great mix-in for added yumminess.
Bake Muffins With Me!
Gather your ingredients and preheat your oven to 375°.
2 cups flour
1 cup Old Fashioned Oats
1/2 cup brown sugar
1 teaspoon baking powder
2 tablespoons cinnamon
2 tablespoons maple syrup
1 teaspoon vanilla extract
1 stick butter (melted)
1 cup milk/milk alternative of choice
1. • In a medium-large bowl, whisk together all dry ingredients. • Stir in wet ingredients (and any mix-ins you may be adding) until well combined.
2. • Spoon into muffin tin. • Bake at 375° for 15 minutes.
Seriously, how easy is that? Once they are done, let the muffins cool for a few minutes. Transfer to a serving plate & enjoy!
The girls loved them with a cold glass of milk! Everyone asked for seconds!
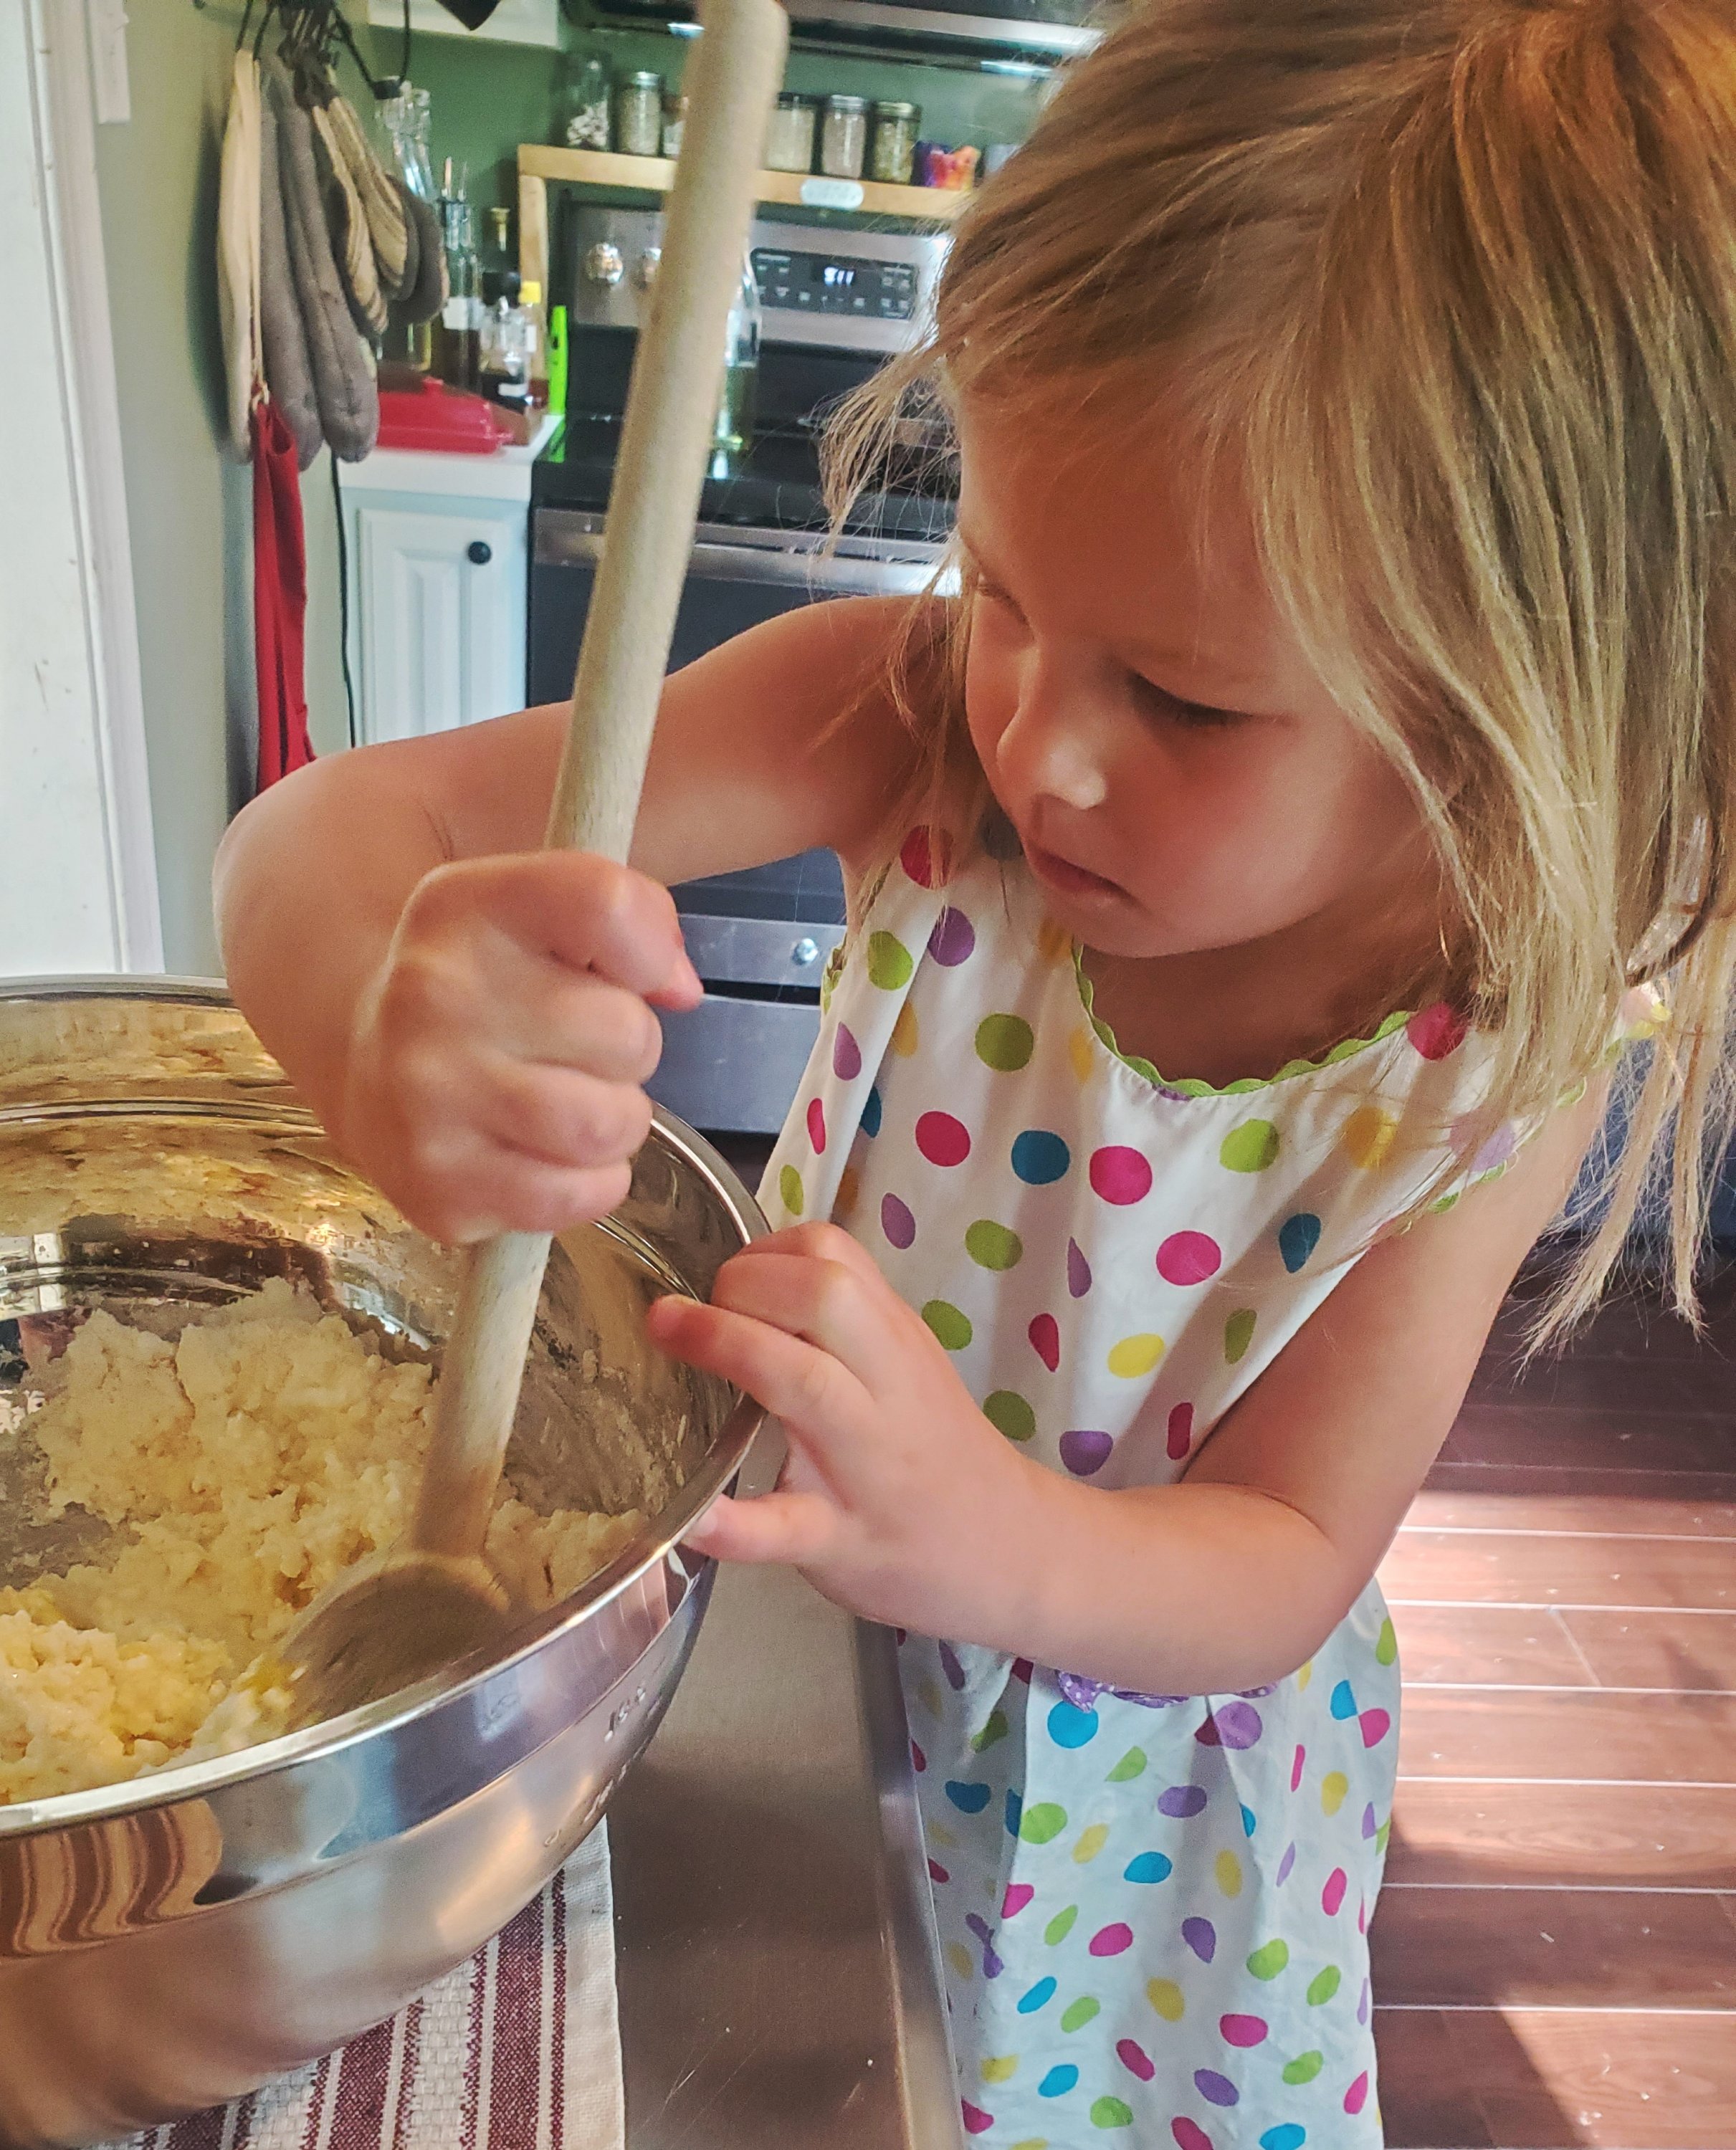
Sasha & I made Syrniki this morning for breakfast! Syrniki are Ukrainian pancakes made from Farmers Cheese. I didn’t have time to pick up real Farmers Cheese, so I used cottage cheese as a substitute. Next time I make these, I’m going to stop in at Marina’s European Food Market and pick up some real Slavic Farmers Cheese.
In case you don’t know us personally, I am Ukrainian & my husband is from Russia. I was lucky enough to grow up learning some of the Ukrainian/Eastern European culture from my dad & his family (his sister, Mary, & her polish husband, Vince, both who are sadly no longer with us.) I loved going to their family parties! Learning the traditions, hearing the language… I loved their accents. I’d ask them to speak to me in Ukrainian, and in Ukrainian they would say, “why should I speak it if you can’t understand it?” I just thought that was the coolest thing ever. I learned a few words growing up, but never the language.
Ever since I was little, I knew I wanted to marry an Eastern European man. I gave all of my children a Ukrainian (or Russian) middle name to honor our heritage: Kaden Yuri (after my dad) 💙, Ella Aleksandriya 💗, Mia Nataliya (after Niko’s birth mother) 💗, Sasha Katiya 💗, Athena Mariyah (after my dad’s sister & my mom, both Mary… *side note: it isn’t supposed to have an “h” at the end. I’m still mad at myself for agreeing to putting that) 💗, & Moses Kolya (after Niko) 💙.
Since the invasion, I have decided to go “full Ukrainian.” I’ve taught myself how to read & write their alphabet confidently. I can now speak Ukrainian at an elementary level. I am teaching my children as I learn so we can be fluent at home. My husband has tried teaching me Russian over the years (which is very similar to Ukrainian), and I’ve tried Rosetta Stone in the past so it wasn’t totally unfamiliar to me, but this time it just clicked- almost like it was unlocked from my DNA bank. I finally would be able to not only understand what they were saying to me, but respond too. I’m so proud of myself.
In addition to all of that, I am learning how to cook Ukrainian foods so that I will be able to pass recipes down to my children to continue embracing our culture for generations to come.
Today we made Syrniki & it turned out REALLY yummy so I decided to share it here.
Gather your ingredients.
2 16oz containers cottage cheese (farmers cheese if possible)
2 eggs
1 cup flour
4 tablespoons sugar
2 teaspoons baking soda
1/2 teaspoon salt
I have a large family & wanted to make sure that I had extra to send to my parents to try. If you have a small family; cut this in half, or make & use for breakfast prep/freezer breakfast meal for later.
Mix together.
Sasha hard at work mixing everything together in a big bowl.
Meanwhile, pour some oil of your choice on a skillet on the stove and let it heat up.
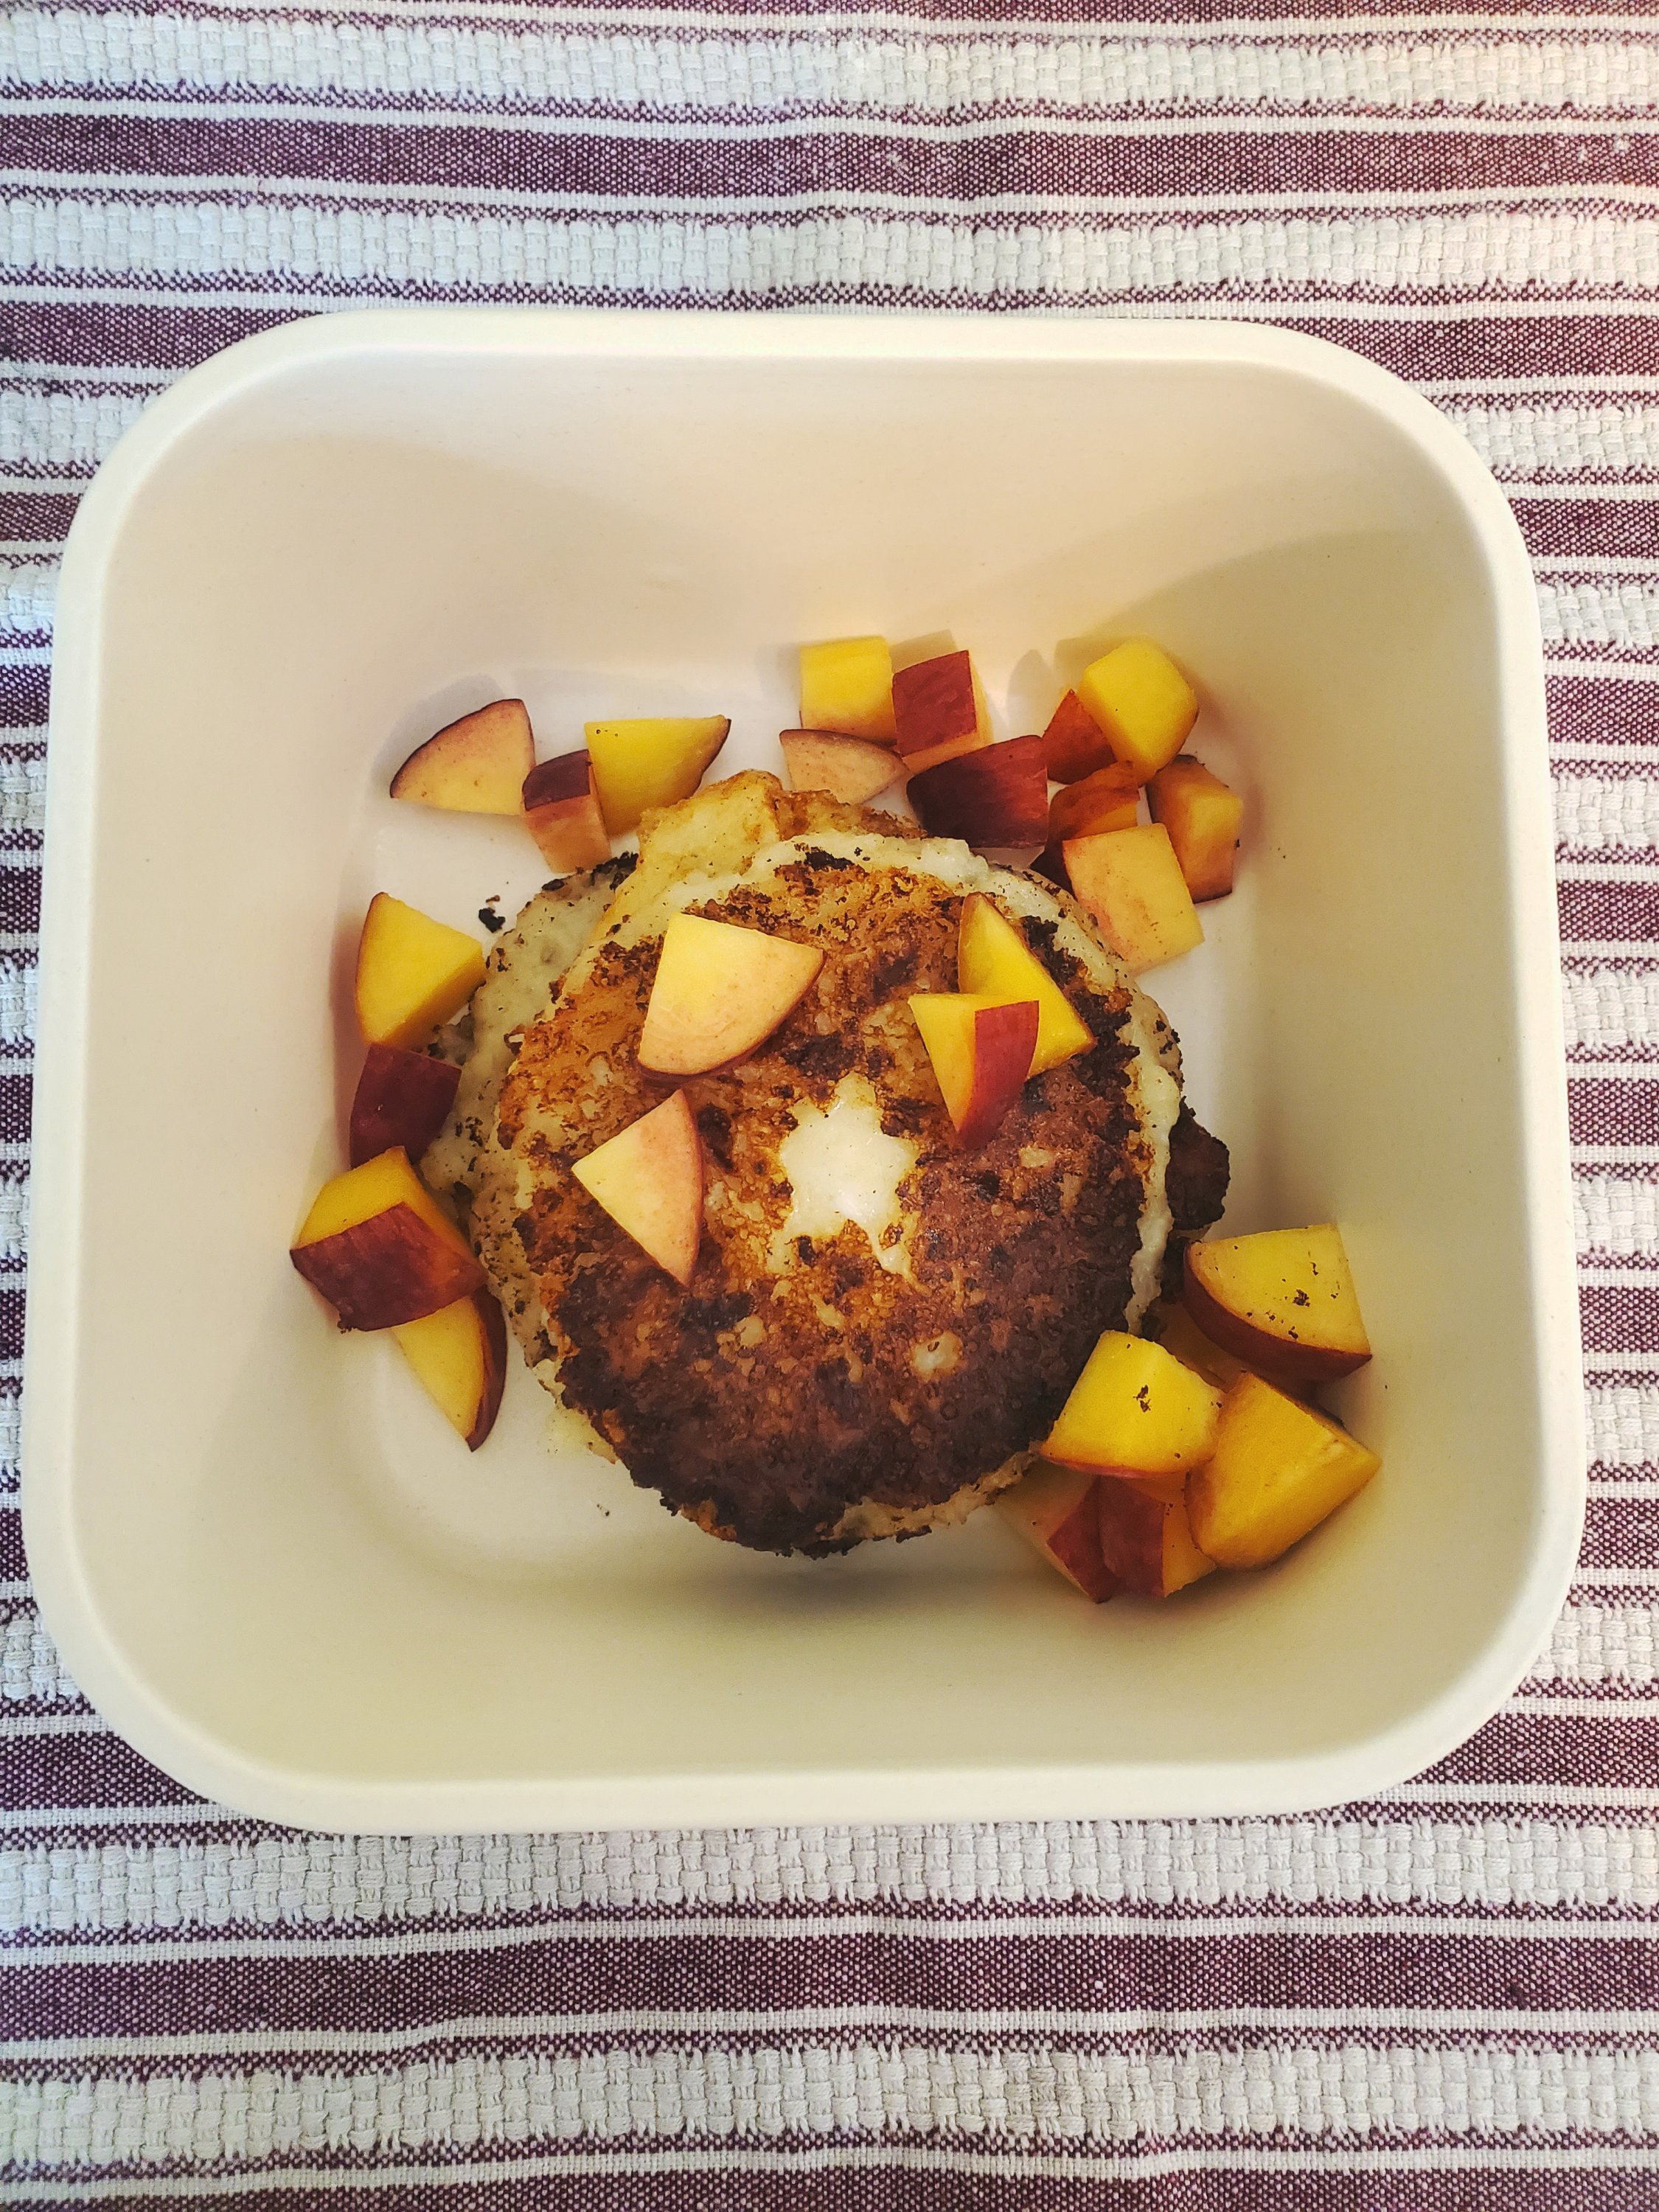
Wash your hands again. Leave them a little wet, but not dripping. Grab a smallish size amount of cheese mixture and form into a patty & place on stove. Wet hands again & repeat one by one. You’ll want to fry them until they are golden brown. DO NOT move them until you see the crust forming on the bottom & the top looks flat like pancake batter, no longer like cottage cheese (the cottage cheese will slop all over the pan if you flip too soon). Flipping is more difficult than with American pancakes.
Once both sides are golden brown, transfer to a place &…
Serve.
I served these with peaches. I had planned on making cream to go with them as well, but got too overwhelmed with the flipping that I decided peaches were enough. Next time I will definitely make the cream ahead of time because it would be a very nice treat to go with them.
Now that I made them and know what to expect, I will feel more confident making them from here on out. I am excited to try them with various toppings, especially other fruits & jams. They are more savory than sweet, so the fruits bring a natural sweetness to them. They are really, really good though- the kids even said they were delicious!
When I began meal prepping, I used “themes” to help me plan meals since too many choices cause me to feel too overwhelmed. Taco Tuesday is a pretty household common theme, but even when you switch up your ingredients frequently, tacos/burritos/burrito bowls can get overdone after so long.
For last night’s “Taco Tuesday” I made a Meatless Mexican Rice Casserole just to change it up a little. It’s a super easy pantry staple meal that can be versatile depending on what you have/what your family eats.
It was really easy to throw it together and really yummy! Everyone especially enjoyed the homemade tortilla chips! I personally would have enjoyed a bit more heat, but since more kids than adults were eating it, I kept it super mild. Next time I will also add onion.
Let’s Get Cooking
For the casserole, you’re going to need:
14 oz Not Chicken Broth
1 cup Jasmine rice
2 tablespoons butter
1 cup sour cream
1 jar salsa of choice (*I used a chunky-ish garden style)
1 can corn
1 can black beans
1 can pinto beans
Cilantro (*fresh is better, but dried works also!)
Salt & pepper to liking
Cheese (*I used Monterey Jack)
For the chips, you’re going to need:
Tortilla shells cut into quarters (I use corn)
Vegetable oil for frying
Sea salt
1. • Add rice and butter to pot, stir frequently until butter is all melted. • Once melted, add Not Chicken Broth & bring to a boil. • Once boiling; cover with lid, reduce heat, & set timer for 20 minutes.
2. Mix together the canned ingredients, salsa, and cilantro in a large bowl while the rice cooks.
3. • Once rice is finished cooking, move to a cold burner & fluff with a fork. Stir in sour cream. • Stir in contents from large bowl + salt & pepper until completely mixed together. • Top with cheese. • Bake 30 minutes uncovered at 375° in a 9×13 dish.
4. • While casserole is cooking, fry your quarter-cut tortillas in batches until they resemble golden tan chips (they harden more and more as they dry). • Sprinkle sea salt after each batch.